Sunday, July 26, 2015

Cabinet Doors


Finally, the cabinet doors are finished! I deliberated for a long time on what to make them out of. In the end I went with bamboo plywood from CaliBamboo out of my birthplace, San Diego, California. The sheets weren't cheap, over $200 apiece.

Initially we wanted to not have any pulls on the doors so I beveled the cuts about 17 degrees. It worked okay on the top doors but didn't really work on the bottom cabinets. I ended up using some pulls I bought from Ikea.

All of the hardware is Blum. Each door has the softclose feature which is really nice. I also added one drawer above the trash which is to the left of the stove.

I used Mylands wax polish to finish them with but I have since found out that it isn't going to work well in the kitchen, it's too soft. So I am not sure what I'll end up doing for that. I do like the color and feel the wax gives them.


Raw Cali Bamboo plywood, awesome material! Super heavy and very hard.


Nearly what I envisioned when we bought this house when it looked like it did on the left. It's a nice space now and we really like it.


Saturday, June 6, 2015

Stair Refurbish

I put off rehabbing the stairs for a long time for no particular reason. But in terms of bang for the buck it's been the best project to date. It was basically free. I did have to buy two 1 x 8's for the risers and some construction adhesive so maybe $30.

The treads had the same orange-ish looking stain on them that the floor originally had so that had to be sanded off. The upper stairs wasn't nearly as gnarly as the lower one and was pretty easy to sand.

I stained the treads with some natural and used two coats of polycrylic after that. They looked so much better for so little work I decided to tackle the stairs going to the basement which are in far worse condition.

Oak treads are about $25 apiece now so all twelve would've been $300 bucks.

I didn't try too hard to make them look perfect so the imperfections and holes are still in the treads. I did replace the risers because they were going to be problematic to paint. I also found out that they were originally cedar. So I am going to repurpose them into birdhouses.

I broke several of the treads prying them up and had to glue them back together which wasn't really a big deal. I had about a five foot long two by four and I baited it up with some short pieces of drop and they pried out lickety split.


Upper staircase
The upper stair on the right after the paint and tread rehab. I also stripped the handrail and refinished it and the brackets as well. The stairs to the basement were by far the worst of the two. After sanding them down they still had lots of discoloration so I stained those a dark walnut.
Lower staircase
The contrast with the white risers ended up being just fine though I wasn't sure how it was going to turn out.

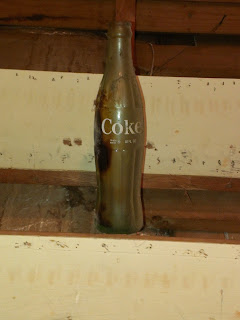
The space behind the upper stair was filthy. I think they swept the first floor dirt under there before they sealed it up. It was like a time capsule with Coke bottles and soda cans.

It's been awhile since I've seen a ten ounce coke bottle. My grandaddy had a Coke machine in his shop that kept them right at freezing and they only cost a dime. Those were good Coca Colas!

Saturday, May 9, 2015

Half wall


I built a half wall to hold books. I am going to add a top to it later when I find the right piece of wood.

At one time there was a wall there that we demo'd. So underneath it the flooring is chopped up. It serves as storage and covers the spot where the original wall used to be.


Here is my hand sketch for the half wall.

It probably took thirty seconds to sketch this out and it would take that long just to open Sketchup.

So most of the time it just simply a lot quicker to sketch on an envelope than it is to bother using Sketchup.


There will be a top added later.

Tuesday, May 5, 2015

Shoji Door

 I had this shoji door built for me by Cherry Tree Design.

It is for the pantry. It's built from walnut.

Cost $800.

This door was suppose to arrive about a week ago. I had been tracking it and I knew that it was already in town. I called them and they said it was going to arrive at lunch. Never came. Next day, nothing. I called them back. It was coming on a smaller truck. Never showed up. Called them back, it was coming tomorrow. Never came. Called them back. It would be here Monday.


By this time I knew there was a problem and I figured they had damaged it. They did. Cherry Tree didn't start building doors yesterday. Apparently they've had damaged shipments in the past. So they put a sticker on the crate that turns red if the shipment gets jarred.

When the truck showed up I could see the crate but I didn't see the sticker so I knew it was on the opposite side, they were trying to hide it. I walked around on the other side and saw that it was indeed red. I told the driver I had to note it on the ticket. He promptly wrote in "Shock monitor red - no apparent damage". This was suspect.

Backside of OSB crate lid
I looked over the crate which was well made out of OSB. There was a gouge in the top of the box just below the warning sticker. If you look closely you can make it out.
On the left you can see the inside part of the lid where it protruded through about an inch. It didn't puncture the door but I think the paper got stretched because it isn't tight like it should be.

Hole in OSB crate
I realize that loads shift in transit and that it was purely accidental. But they went out of their way to conceal it from me and the vendor, that's the part I can't stand. I lost a lot of time waiting on them to deliver it.

I'll never use Conway to ship anything

Sunday, March 29, 2015

Backsplash

We installed a marble tile mosaic in the kitchen for the backsplash. It was a total of about 27 square feet.
 Each box of tile contained 10 square feet of tile so we boght three boxes. It was $12/box. We laid the tile on the first day and then grouted it on the second day. We added the grout optimizer to the grout too. It is suppose to keep any stains from ever happening on the grout. We used unsanded grout.
We used a diamond cutting wheel on an angle grinder to cut the pieces so a tile saw wasn't necessary. Before grouting we applied sealer to the marble.


It's good to use a razor scraper and a light to make sure all the mastic is off the tile. There is a lot you won't be able to see until you get very close with a light you can hold in your hand.


Before
The simplest thing to do to span the gap between the cabinets where the stove goes is to screw a piece of scrap wood to the wall to rest the tile on. We just used a piece of scrap plywood.

Cost, around $500.


Now that's white!


A while ago the backsplash was white plastic glued to the wall. Perfectly functional but not a whole lot of character.


Monday, March 2, 2015

New Kitchen Cabinets


Top new, bottom old 
I've been busy lately building new cabinets to replace two in the kitchen. The two wall cabinets in the corner are the wrong size.

When I built them I didn't factor in the thickness of the doors. I could slide them over but then the window would not be centered and on the other side of the wall the vent hood wouldn't be centered.

It's not a bad thing though because I put one in my office and the other one is in the laundry room.

I still have the refrigerator cabinet enclosure to build as well. We haven't decided on a door style yet either. Slab door seem the most fitting but they're also the most expensive. It hasn't been bad not having cabinet doors however and I've noticed that lots of people are forgoing them altogether these days. But the base cabinets definitely need doors.


Sunday, February 22, 2015

Sketchup

3D Birdhouse modeled in Sketchup
I've seen so much lately about Sketchup that I decided that I should look into it.

I have been using AutoCAD since version 10 in the early nineties. Needless to say, I'm somewhat entrenched in ACAD's operation.

I think that is a hinderance to someone just starting out in Sketchup.

I first learned how to draft on a board with paper and pencil. AutoCAD is, or was, basically just a virtual piece of paper. All 2D. So you still had to be proficient at visualizing sections and elevations.

ACAD always tried to incorporate some 3D functions into the program but I always found them cumbersome and nobody used it for that. There were third party programs that were much better.

Sketchup sort of bypasses the drafting aspect and is a full on modeling environment. Trying to do a simple blueprint in Sketchup is not really worth the effort. It isn't set up for that. It's a model, not a drawing. That hung me up, a lot. I'm used to drawing everything with lines, not building it with shapes. The interface takes a lot from AutoCAD, there are lots of similarities.

I've spent a few days becoming acquainted with Sketchup and I've watched a lot of tutorials on Youtube as well. The birdhouse rendering is the result of the last two days. I could have built fifty real birdhouses in the time it's taken me to model it. But I'm starting to get the hang of it.

I probably sketch some idea out on paper at least once a day just to hash it out a bit. If it turns into something that I want to build I usually take the hand drawing and lay it out to scale in AutoCAD. Then I can usually find anything I might not have considered when I sketched it. I can usually get a shop drawing knocked out in an hour or less with CAD, depending on the complexity. I have the entire house drawn and I refer back to it constantly, especially the kitchen, where I actually have all the cabinet elevations drawn.

If I tried to model the kitchen in Sketchup it would take me forever and it would be hard to get it completely accurate. It just wouldn't be worth the time and effort. I'm sure someone could do it in no time. Most of the time however, I just don't have a need for a model. But I have several projects that I've been thinking of for a while that might be good candidates.

And Sketchup has a lot of cool features that might be of benefit to me in the future. It has a feature that enables you to bring in a site from Google maps that could be very helpful. Plus, I have seen a lot of awesome looking work that people have done with it who aren't engineers or architects, just folks who like to design. That's what the price tag of Sketchup enables. Cost, free!